ComfyUI Panorama Stickers
We released a LoRA and ComfyUI custom nodes for making a 360° panorama from your own photos. The LoRA is for the 4B and 9B versions of the image generation model FLUX.2 [klein].
Each photo is placed in the 360° scene facing the way it was taken, and AI paints in everything around it. You can place as many photos as you like.
A photo as part of the 360° scene
One way to make a panorama from a photo is to pass the photo as a reference image and have the model draw from it. But then the photo is only a hint of the mood you want. The photo itself may not survive into the panorama, and you can't choose which direction it ends up in.
We treat the photo differently. A 360° panorama can be thought of as the surrounding scene painted on the inside of a sphere with you at the center. An ordinary photo is a piece of that sphere, cut out in one direction at one angle of view. So if you put the photo back on the inside of the sphere, facing the way it was taken at the same angle of view, part of the panorama is filled by the photo itself. Paint in the rest, and you have a 360° scene that still contains the photo.
Painting in the rest is exactly inpainting, filling in the missing parts of an image. The LoRA learned to paint in a whole panorama from one where only the photos are filled in.
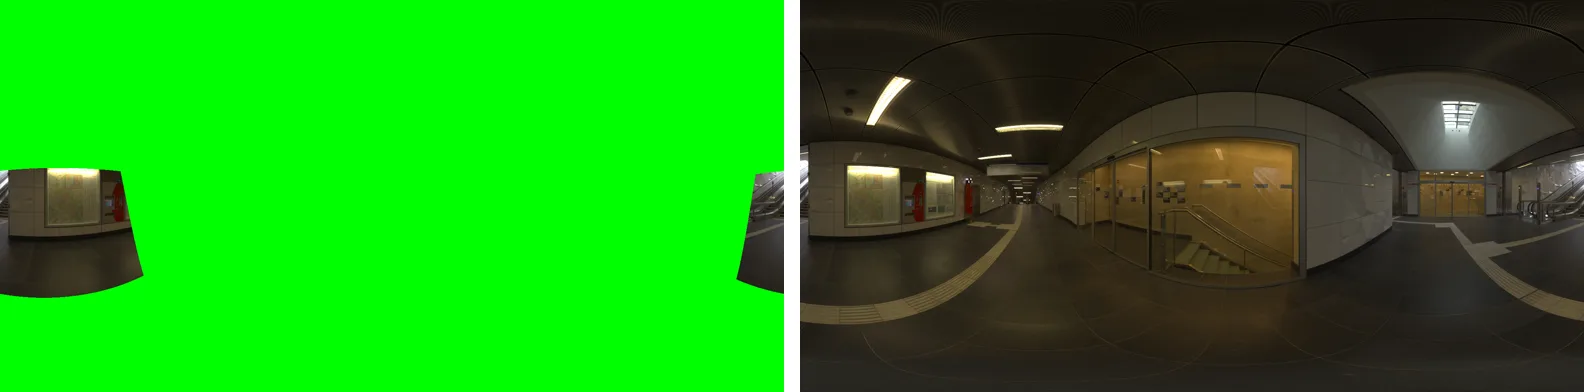
You can place as many photos as you like. Put a photo of the seaside in front and a photo of a street behind you, each facing its own way, and the space between them is painted in to make one scene.
Place while looking around, then aim and shoot
A panorama is saved as one wide image, the sphere unrolled flat (the equirectangular projection). The image is stretched more and more toward the top and bottom, so photos placed on the flat image end up in the wrong place or at the wrong size. The custom nodes let you place photos from inside the panorama while looking around, at the direction and size you see.
It also works the other way: you can cut ordinary photos out of the finished panorama. Choose a direction and an angle of view inside the panorama, and you get an image as if a camera had been pointed that way. You can take as many shots of the same scene from different angles as you like.