We develop AI, evaluate technologies, and share production expertise for content creation.
We have particular expertise in designing and operating image- and video-generation AI workflows with ComfyUI.
Mission
“Turning AI into Matatabi.”
We aim to go beyond what is merely technically possible, refining AI into expressions that move people—their “matatabi.”
Company
Company name
Matatabi AI LLC
Representative
Hotaka Toyama
Co-founder
nomadoor
Founded
August 25, 2026
Address
601A Life Kanazawa Daiichi Building, 5-6 Konohana-machi, Kanazawa, Ishikawa, Japan
Business
Planning, development, and provision of systems and services using artificial intelligence Planning, production, sale, and distribution of digital content
Matatabi AI develops AI, evaluates technologies, and shares production expertise for content creation. We specialize in using image- and video-generation models and designing and developing production workflows, particularly with ComfyUI.
For inquiries or collaborative development, please contact us.
ComfyUI
We build image- and video-generation environments, design workflows, and develop custom nodes with ComfyUI.
Workflow design
Analysis and improvement of existing workflows
Custom node development
AI development
We adapt existing generative AI models to specific uses and creative goals.
Focusing on fine-tuning and LoRA, we evaluate everything from training-data design and training conditions to output quality.
Training-data organization and design
LoRA / fine-tuning design, training, and evaluation
Development of production-support tools
Technical evaluation
We evaluate new generative AI models and techniques based on whether they can be used in actual production.
Evaluation of new models
Comparison of multiple techniques
Integration into production workflows
Production expertise
We organize insights from hands-on development and production into reproducible resources.
Technical articles
Tutorials
Technical evaluation reports
Internal adoption materials and documentation
Contact
Send us your question or project inquiry using the form below.
Kura
OSS
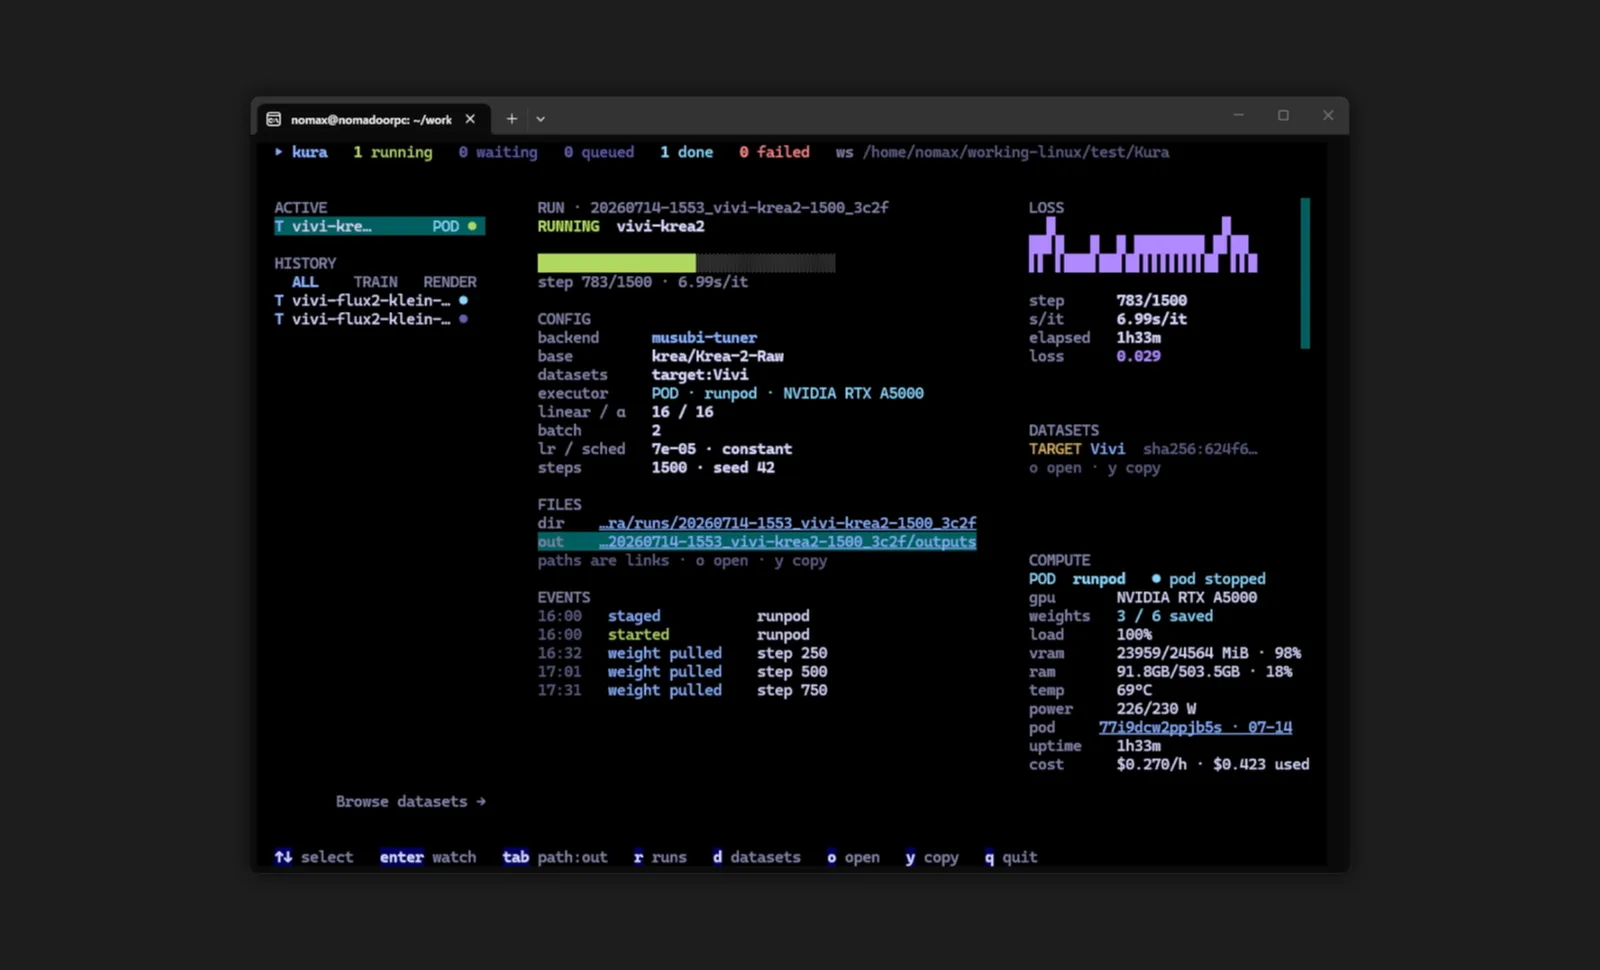
We released Kura, a workspace for training LoRAs for image generation models together with an AI agent. People focus on datasets and parameters, and the agent takes on the work of running the training. Every result is recorded and used for the next training run.
What really needs thought in making a LoRA is which dataset to prepare and which parameters to train with, and nothing more. In practice, though, most of the time goes to setting up each trainer's different environment, writing its settings, watching the training, and sorting out the results. A good LoRA rarely comes from one run; it takes many, so that effort is repeated each time.
Today that effort can be handed to an AI agent. But having an agent build the environment from scratch every time is wasteful, and what was tried is left nowhere. We built Kura to give the agent the tools to run training reliably and a place to keep what was tried, so that people can focus on datasets and parameters.
Works the same for everyone
Each trainer comes with an environment in which it has been checked to work. Because it doesn't depend on your own setup, it works the same whoever uses it and whichever AI runs it.
Stopping time-wasting mistakes early
LoRA training can take days. If a mistake in the dataset or settings only shows up after training, all that time is lost. Kura checks the plan before training starts and stops mistakes that would waste that time.
Knowledge that builds with every run
In Kura, the settings, the results, and the evaluation of the person who looked at them are all kept as files. When the agent plans the next run, it reads these records and makes its proposal based on what to change from last time and how the last run was judged.
Until now, what people learned about making LoRAs stayed only in their heads or in conversations that scroll away. In Kura, it accumulates as files with every experiment and is put to use in the next run.
FLUX.2 Klein Schematic LoRA
Works
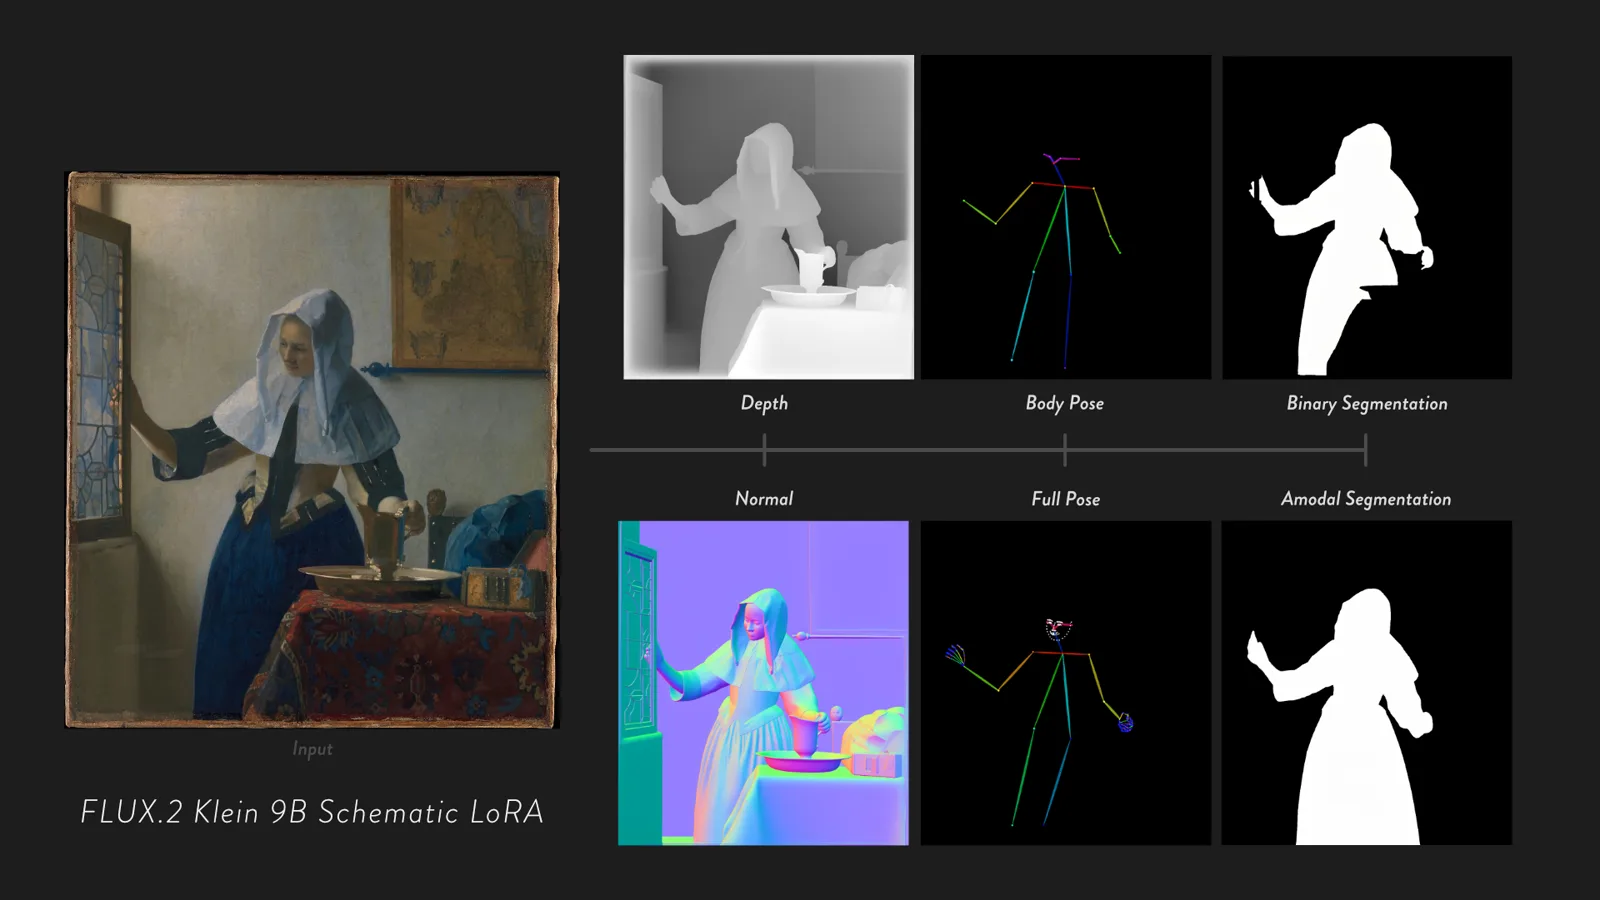
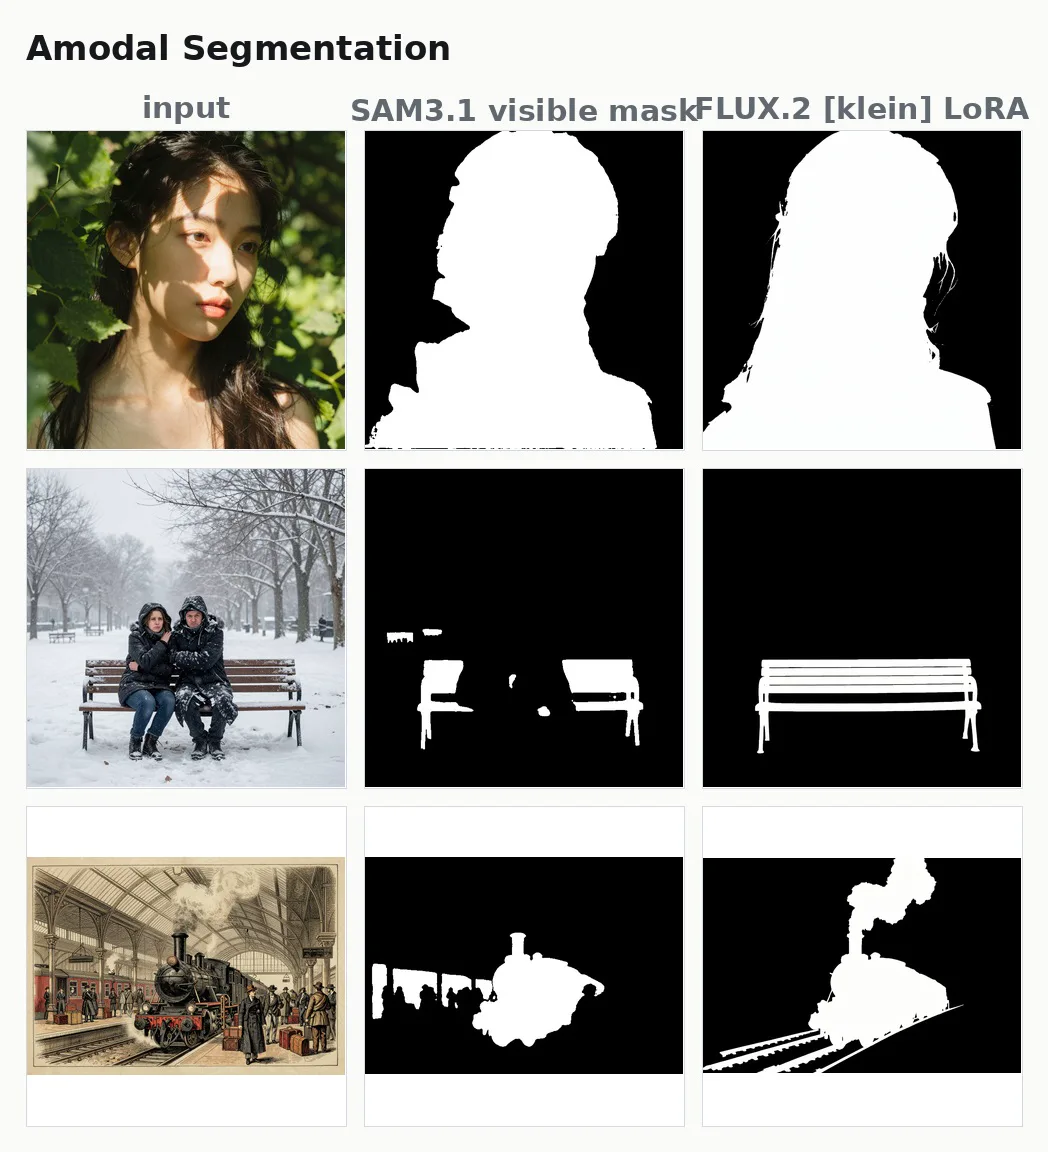
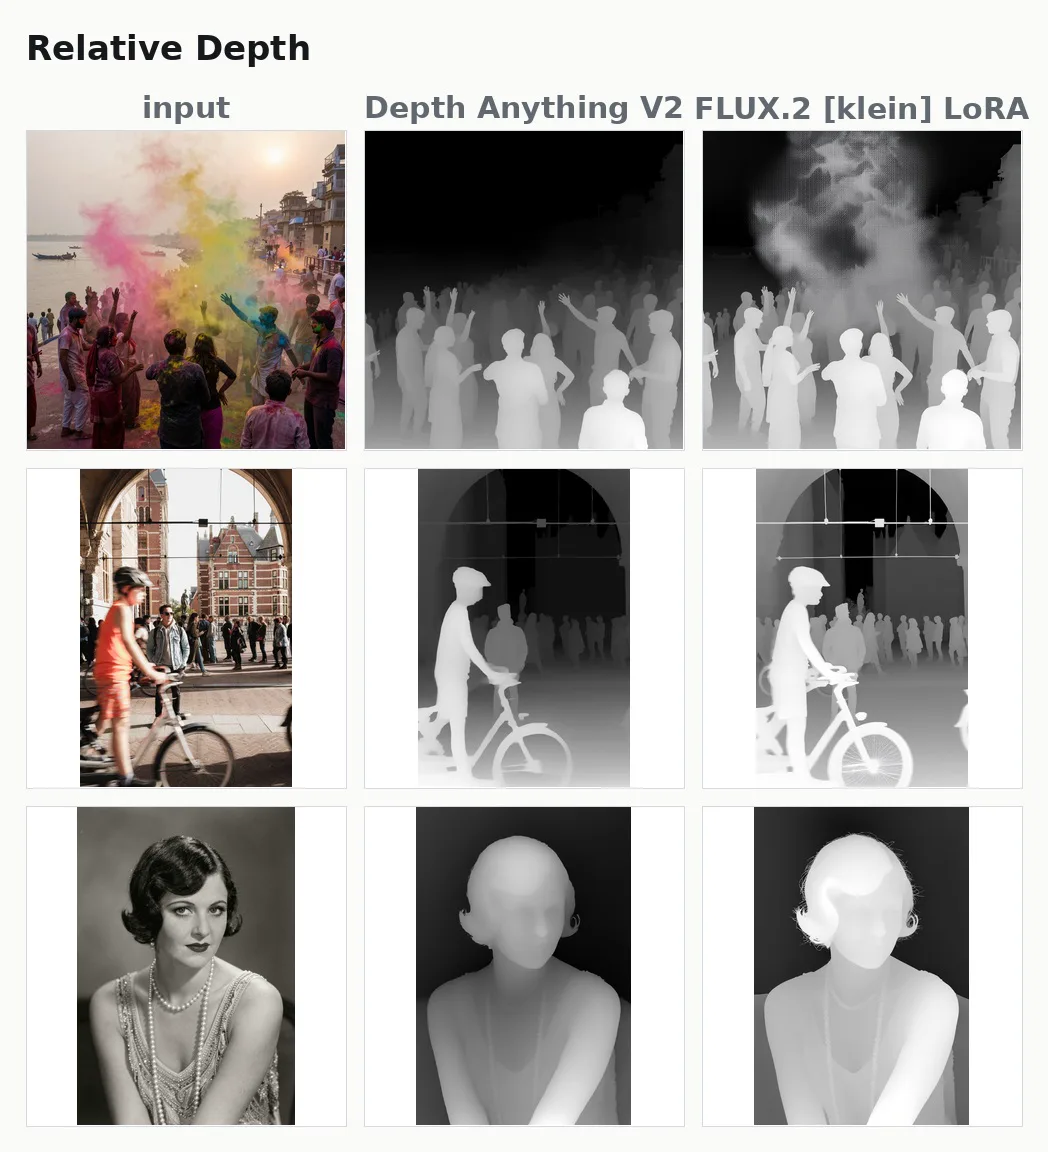
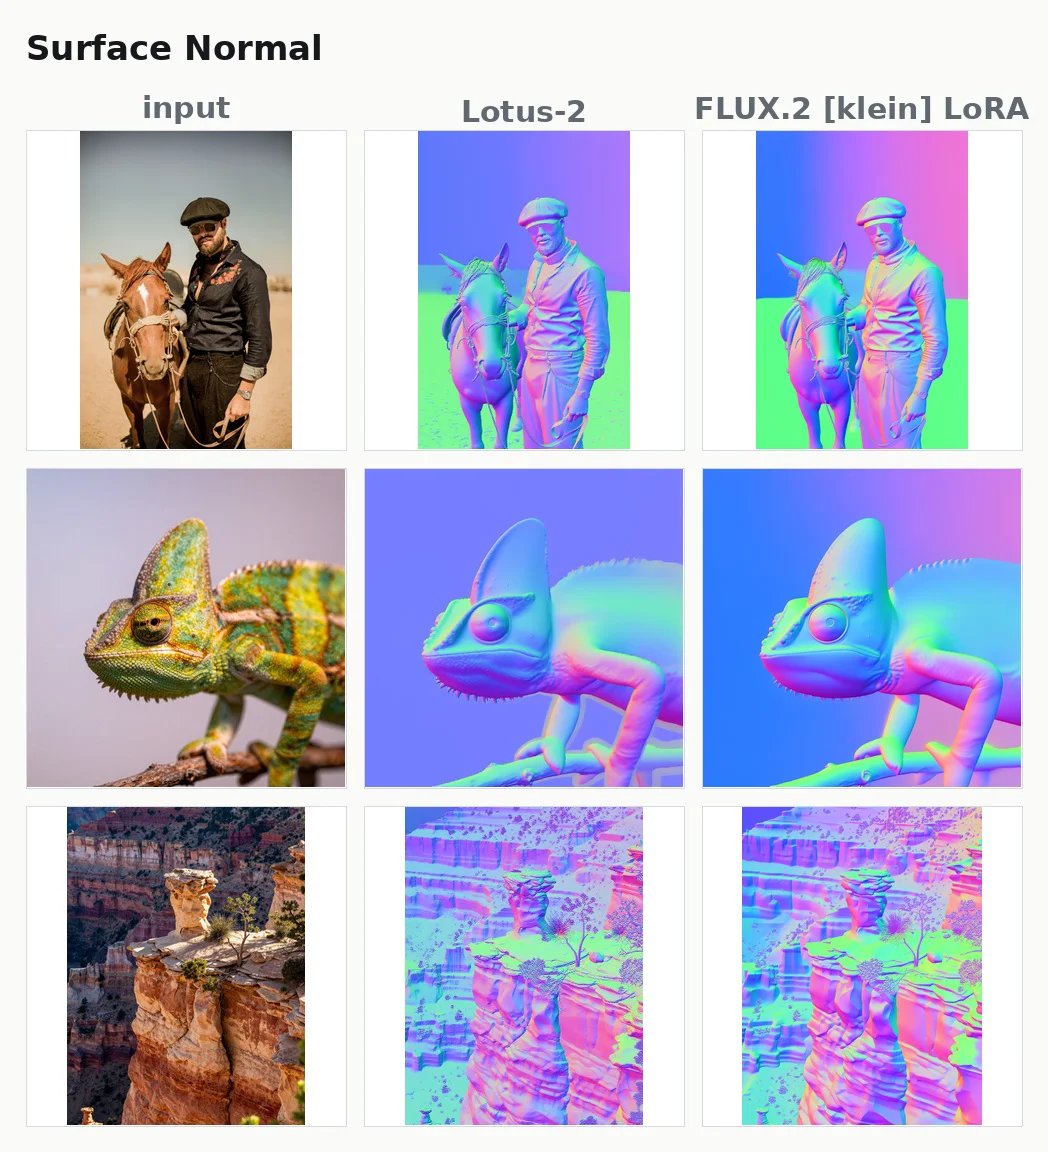
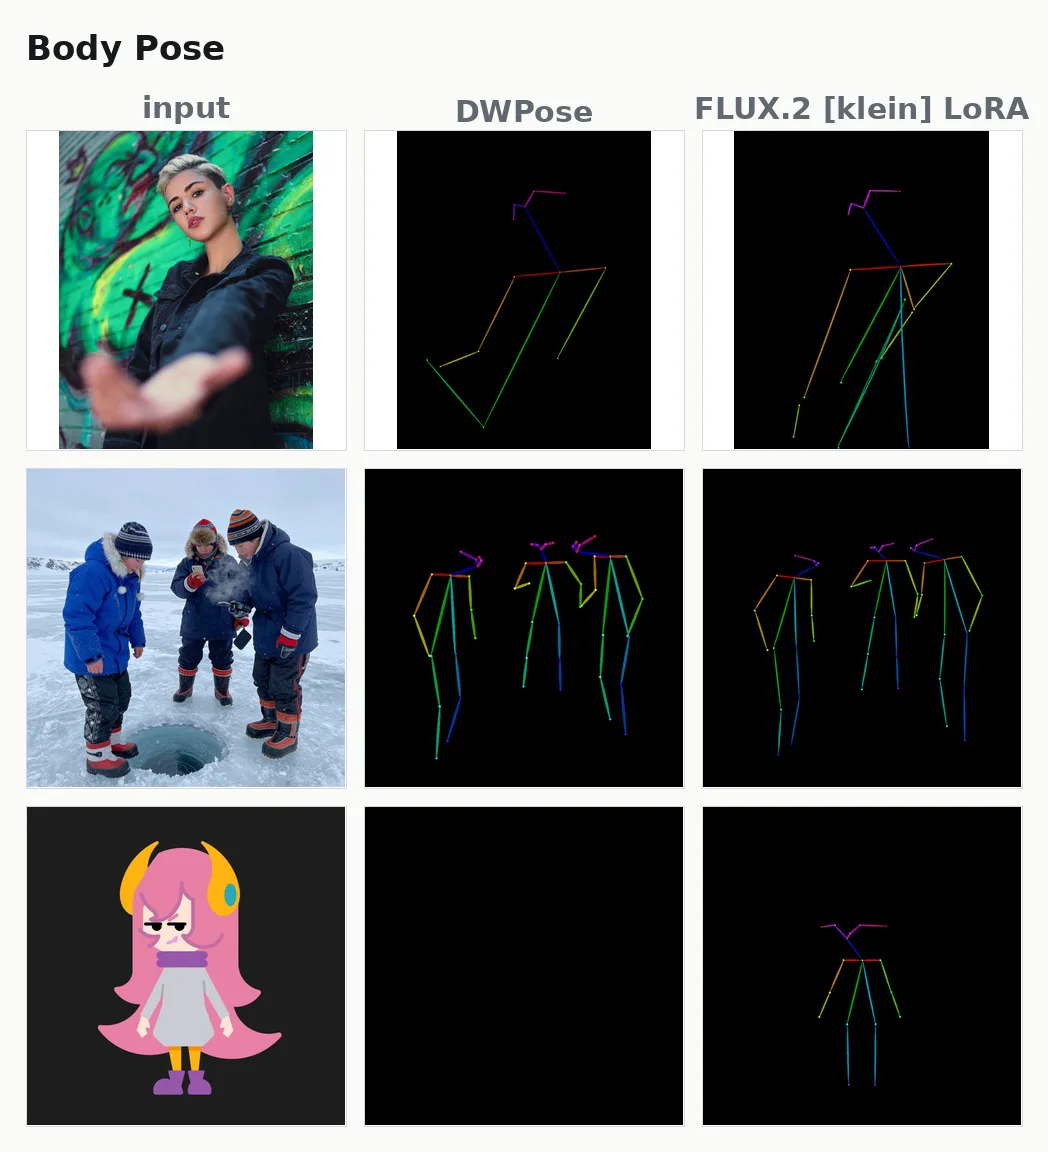
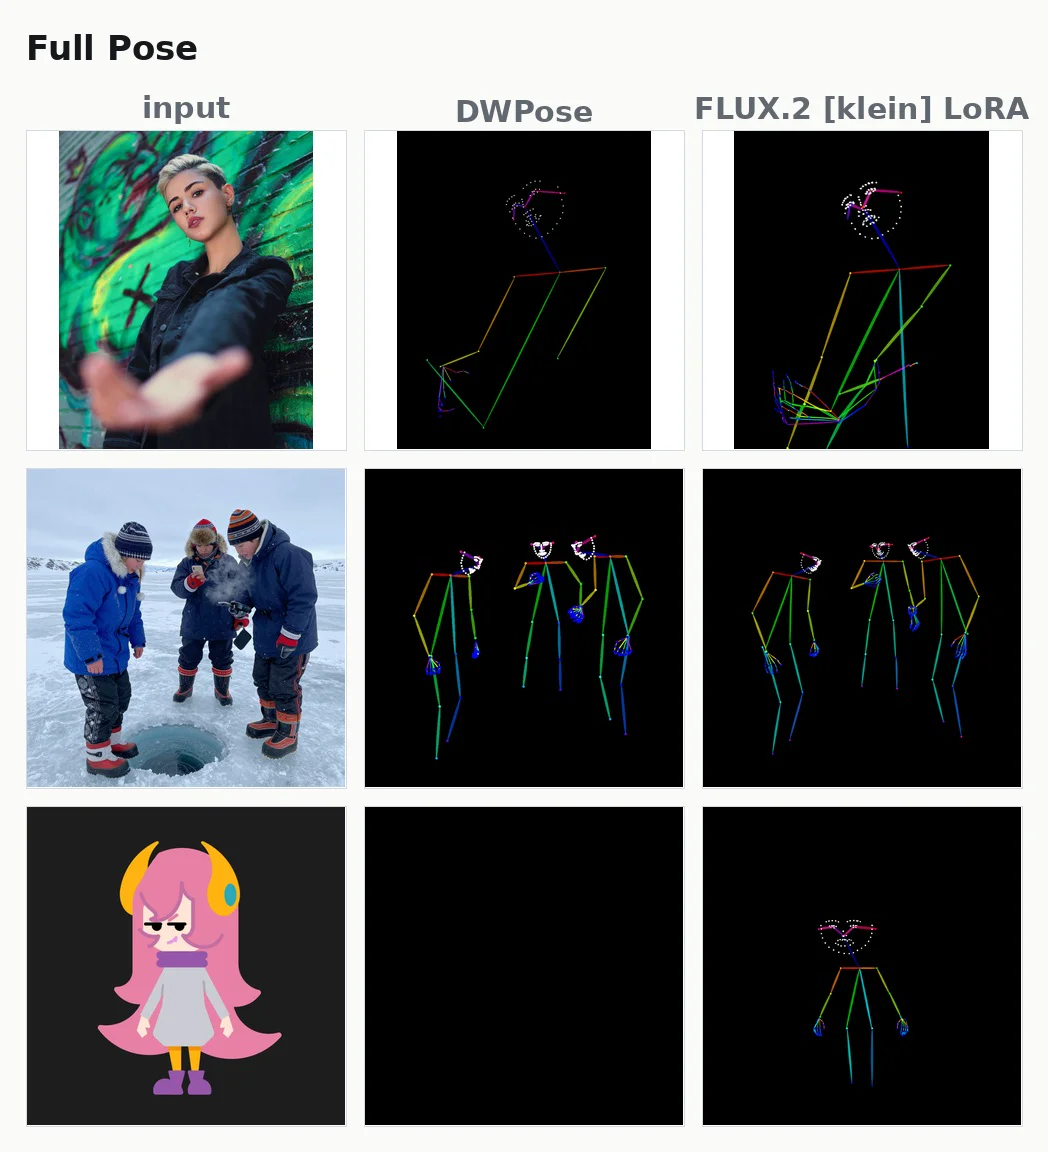
We developed and released six LoRAs for the image editing model FLUX.2 [klein] 9B that turn a photo into a depth map, a normal map, a human pose, or a cut-out mask. Work that normally needs a dedicated recognition model for each task is done as an edit: redrawing the photo as a different image.
All six run locally. They are less accurate than the dedicated models, but some results are ones only an image generation model gives, such as cut-outs that include the parts of an object hidden from view.
Image recognition tasks (computer vision tasks) such as depth estimation and segmentation usually use a dedicated model for each task. Google DeepMind has published research, Vision Banana, that treats these tasks as image editing.
That work led to our starting question: could FLUX.2 [klein] do the same?
Simply reproducing Vision Banana would not have been very interesting, so on top of depth and normal map estimation we added two tasks: pose estimation and amodal segmentation. We chose them because both are common parts of image generation pipelines. Poses, like depth, are a standard ControlNet input, and segmentation masks are often used to mark the area to redraw when inpainting.
Cutting out what can't be seen
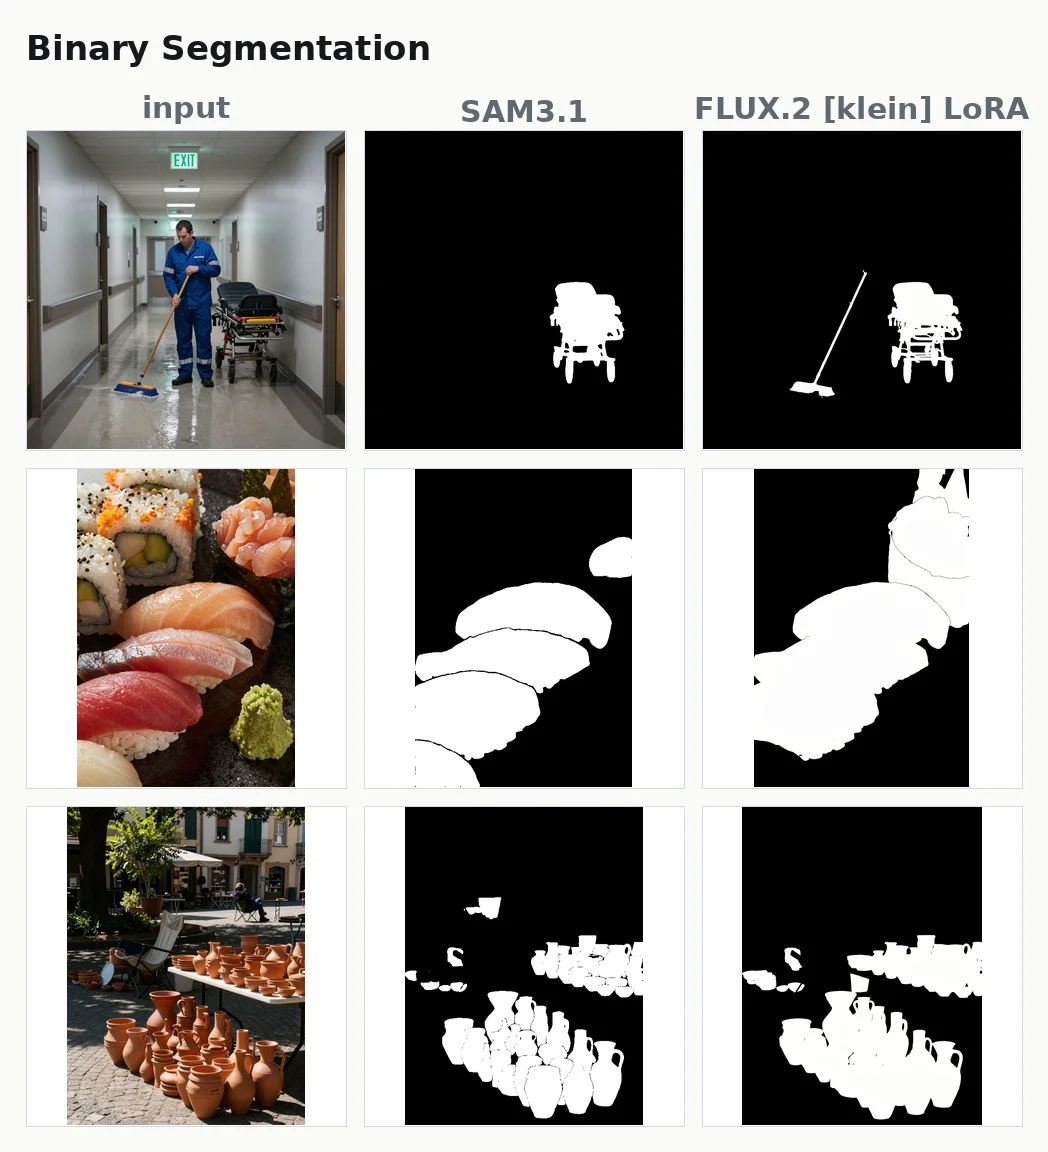
Ordinary segmentation cuts out only what is visible. Amodal segmentation also imagines the parts that can't be seen. If a person stands behind a car, ordinary segmentation cuts out the shoulders and head showing above the roof; amodal segmentation also imagines the body hidden by the car.
Imagining and drawing what can't be seen is what image generation models do best. Where SAM 3.1, a dedicated model, cut out only the visible parts of a bench, the LoRA drew the whole bench, including the backrest and seat hidden behind the people.
Amodal segmentation. Middle: SAM 3.1, which cuts out only what is visible. Right: the LoRA
Six tasks
The six tasks are depth, normal maps, body pose, whole-body pose including hands and face, segmentation, and amodal segmentation. Training them together in one LoRA made the tasks bleed into each other, so each task has its own LoRA.
Depth. Middle: Depth Anything V2. Right: the LoRANormal maps. Middle: Lotus-2. Right: the LoRABody pose. Middle: DWPose. Right: the LoRA. For the character in the bottom row, DWPose detects nothingWhole-body pose including hands and face. Middle: DWPose. Right: the LoRASegmentation. Middle: SAM 3.1. Right: the LoRA
Weight, and the difficulty of choosing
There are open problems. One is that this is heavy for a vision task: running a 9B image generation model takes more time and compute than a dedicated recognition model.
The other is segmentation. Not only amodal segmentation but ordinary segmentation too turned out to be hard. Depth maps and normal maps are, in a sense, style conversions, so they come easily. Segmentation adds a harder step: reading the prompt and choosing which thing in the image to cut out.
The training data is published together with how it was made.
ComfyUI Panorama Stickers
WorksOSS
We released a LoRA and ComfyUI custom nodes for making a 360° panorama from your own photos. The LoRA is for the 4B and 9B versions of the image generation model FLUX.2 [klein].
Each photo is placed in the 360° scene facing the way it was taken, and AI paints in everything around it. You can place as many photos as you like.
One way to make a panorama from a photo is to pass the photo as a reference image and have the model draw from it. But then the photo is only a hint of the mood you want. The photo itself may not survive into the panorama, and you can't choose which direction it ends up in.
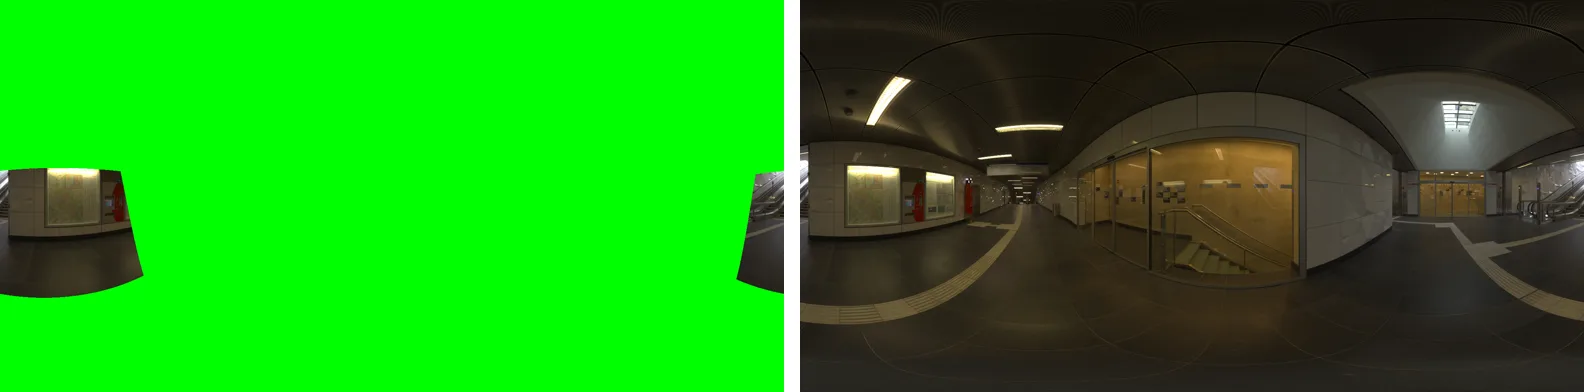
We treat the photo differently. A 360° panorama can be thought of as the surrounding scene painted on the inside of a sphere with you at the center. An ordinary photo is a piece of that sphere, cut out in one direction at one angle of view. So if you put the photo back on the inside of the sphere, facing the way it was taken at the same angle of view, part of the panorama is filled by the photo itself. Paint in the rest, and you have a 360° scene that still contains the photo.
Painting in the rest is exactly inpainting, filling in the missing parts of an image. The LoRA learned to paint in a whole panorama from one where only the photos are filled in.
One training example. The model learns to go from the left, where only the photo is filled in, to the finished panorama on the right
You can place as many photos as you like. Put a photo of the seaside in front and a photo of a street behind you, each facing its own way, and the space between them is painted in to make one scene.
Place while looking around, then aim and shoot
A panorama is saved as one wide image, the sphere unrolled flat (the equirectangular projection). The image is stretched more and more toward the top and bottom, so photos placed on the flat image end up in the wrong place or at the wrong size. The custom nodes let you place photos from inside the panorama while looking around, at the direction and size you see.
It also works the other way: you can cut ordinary photos out of the finished panorama. Choose a direction and an angle of view inside the panorama, and you get an image as if a camera had been pointed that way. You can take as many shots of the same scene from different angles as you like.
ComfyUI Workflow Image Export
OSS
We released a ComfyUI extension that exports a workflow as an image. Exported as PNG, the image carries the workflow data, and loading it into ComfyUI restores the same workflow.
It also handles background and padding, exporting only the selected nodes, and exporting the Node 2.0 canvas.
ComfyUI embeds the workflow in the images it generates, and loading such an image restores the workflow. This extension uses the same mechanism for screenshots of the workflow itself. The screenshot you show and the data you run become one image.
ComfyUI-Custom-Scripts (pythongosssss) had a similar feature, but it no longer works. This extension is a separate one we built with it as a reference.
Improvements for guides and sharing
Since release we have kept adding features, such as Node 2.0 support and exporting only a selected area. It is meant for people who write guides like Comfy with ComfyUI and for people who share workflows with others. The aim is to make, with little effort, one image that works both as a screenshot in an article and as a file you can load.
Node 2.0 export uses the browser's screen capture, so it currently needs a Chromium-based browser such as Chrome.
Comfy with ComfyUI
Works
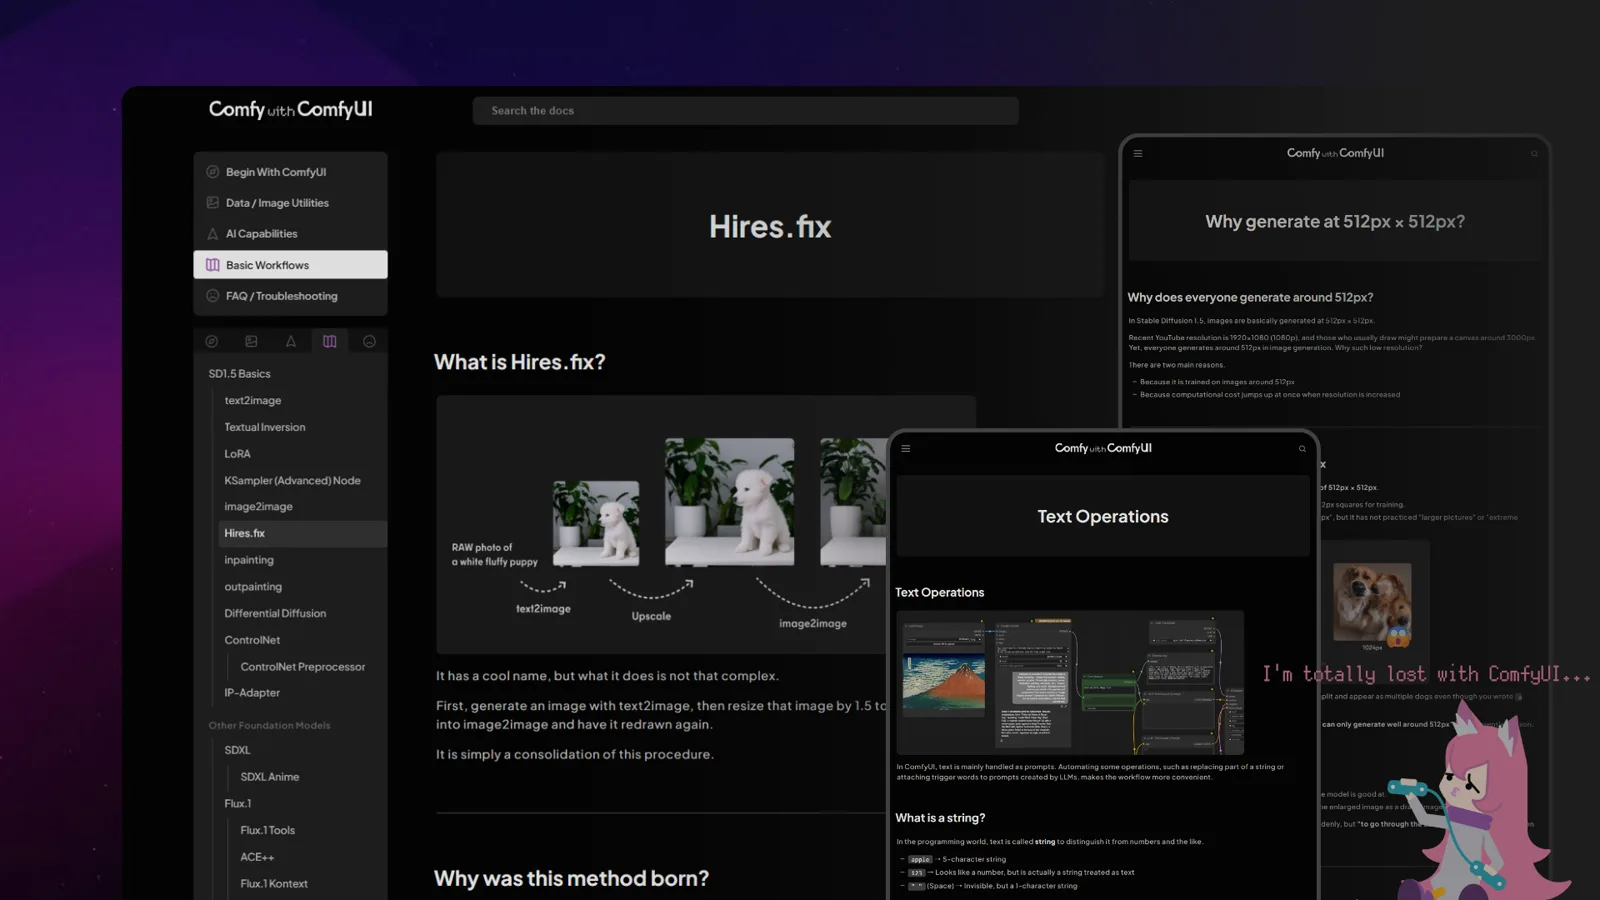
We run Comfy with ComfyUI, a guide site for ComfyUI. Rather than chasing how to use each model, it explains ComfyUI from the fundamentals shared by every model. It is published in three languages: Japanese, English and Chinese.
There are plenty of ComfyUI articles and videos, and now there is an official manual as well. Yet when we started the site, there was surprisingly little that explained only the basics, step by step.
ComfyUI works in a simple way. The basic shape of text2image has not changed from older models to the latest ones. Applications like inpainting and ControlNet are built on top of that basic shape too. Rather than introducing a workflow that can do some particular thing, learning these basics one at a time lets you handle new models with the same way of thinking.
That is why every workflow on the site is minimal and simple. Features are not bundled together; each one is explained carefully so that understanding can grow one step at a time.
Beyond AI
Besides the nodes that run generation models, ComfyUI has nodes for resizing and cropping images, making masks, splitting video, and more. The site covers these non-AI parts as carefully as generation.
Read it, then try it
Almost every workflow we introduce is available as JSON. Copy it and paste it onto the ComfyUI canvas, and the workflow from the article is recreated as is, so you can try it as you read.
ComfyUI Video Stabilizer
OSS
We released custom nodes for ComfyUI that stabilize shaky video. They output the edges that stabilizing pushes out of frame, so a video generation model can paint them in. There is also a node that adds camera shake to footage.
Stabilization itself is nothing special. It has long been done as a mechanical process, and these nodes use those same techniques.
Generative AI changed one thing, though: video can now be outpainted, which means drawing what lies outside the frame.
Stabilization shifts each frame against the shake, so the edges of the frame move out of view. Until now, the stronger the stabilization, the more field of view had to be given up. With a video generation model, the missing edges can be filled in.
For this, the nodes have two modes, crop_and_pad and expand, that deliberately keep the exposed areas in their output.
If shake can be removed, it can be added
A later addition is a node that adds camera shake. If shake can be taken out, it should be possible to put it in. You choose the kind of shake, such as tripod, handheld, walking, action, or vehicle vibration, and how strong it is.
AI-generated video is often too smooth, and a simple step like this that adds some texture works surprisingly well.
Left: the generated video. Right: the same video with added shake
The shake removed by stabilization is also kept as data, so it can be put back into the footage later.
Cross-Image Try-On LoRA
Works
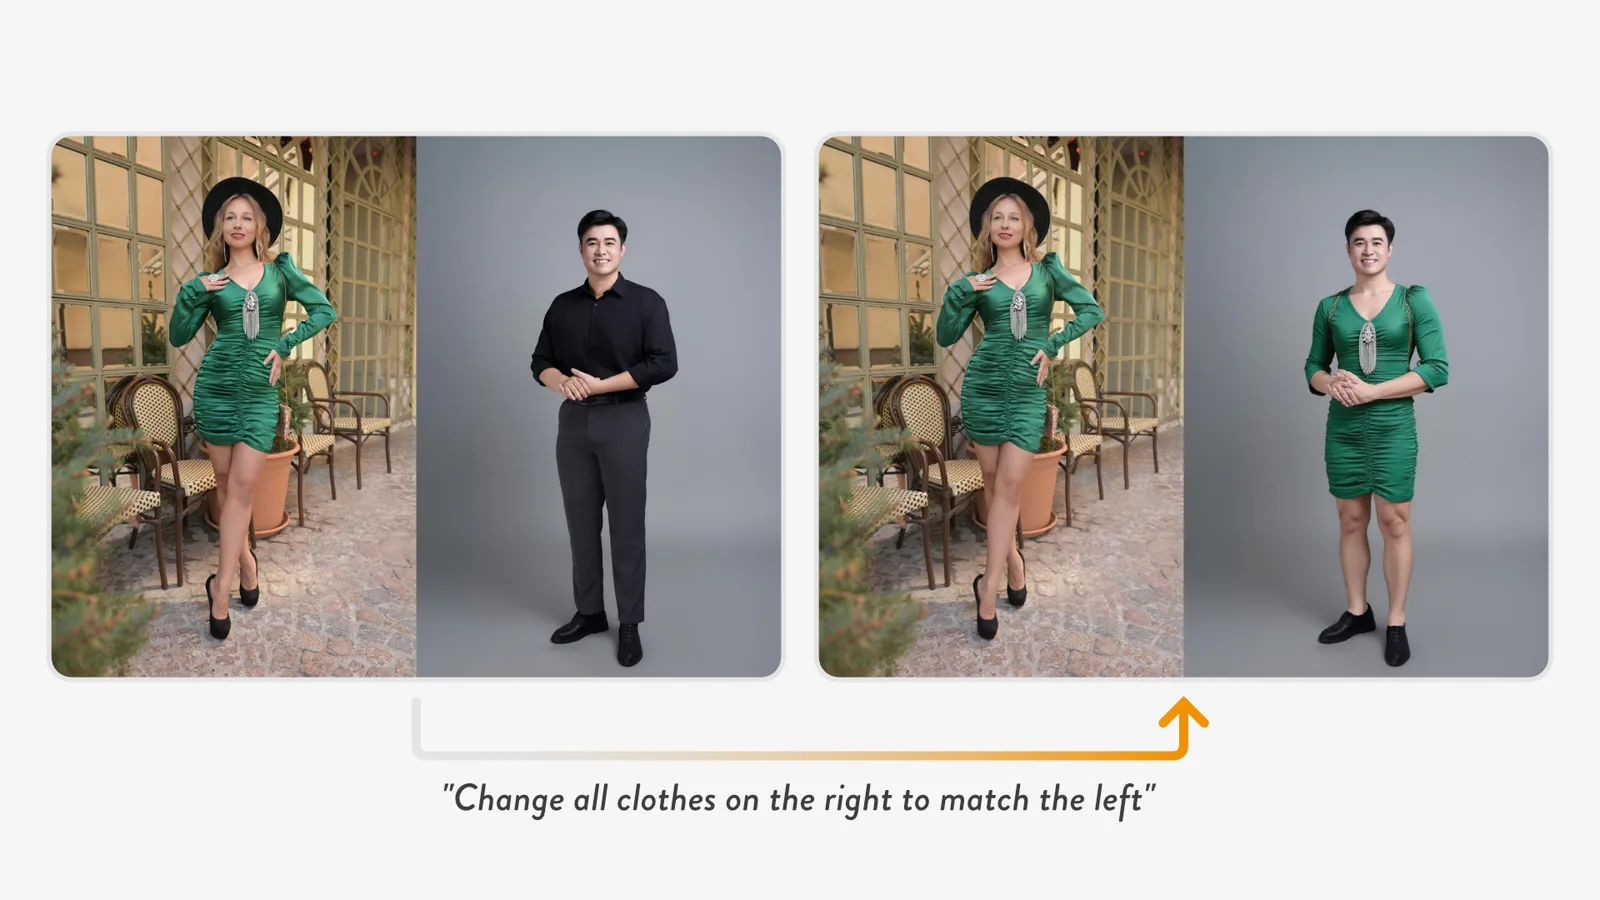
We released a LoRA for the image editing model FLUX.1 Kontext that dresses the person in one image in the clothes from another. Kontext accepts only one image, so the image of the clothes to reference and the image of the person to dress are placed side by side and given to it as a single image.
The instruction is a single sentence: "Change all clothes on the right to match the left." With this LoRA, Kontext looks at the clothes on the left and redraws only the clothes of the person on the right.
Kontext is an image editing model that redraws the image it is given according to an instruction. Like most image editing models at the time, it accepted only one input image. To dress a person in the clothes from another photo, the model has to see a second image, and there was no way to show it one.
Side by side, as one image
Our starting point was ACE++, an image generation technique. ACE++ places a reference image and a blank area side by side as one image, then fills the blank side by inpainting. Because both are in the same image, the model can look at the reference on the left while drawing the right.
The same should hold for an image editing model. Put the clothes to reference on the left and the person to edit on the right, and to Kontext it is just one image. If the model treats the left half as a reference and edits only the right half, even a model that takes one image can edit with a reference image.
A LoRA that treats the left half as a reference
Before training, Kontext simply edited the side-by-side image as a single picture and could not use the left half as a reference. So we trained a LoRA on pairs: the input image with clothes and person side by side, and an output image where the person on the right is wearing the clothes from the left.
With the LoRA, the left half stays as it is, and the person on the right keeps their face and pose while only the clothes change to those on the left. The output is also a side-by-side image, so you crop the right half to use it.
Now that more image editing models accept several images directly, there is no longer any need to place images side by side. At the time, though, it was a meaningful way to let an editing model that takes only one image use a reference image. The accuracy is not good enough for practical use, so it is published for research and experiments.